
OK, so I still haven’t made it on the road yet, but before I leave my beloved House of Glee, I wanted to throw one last party to see all my friends in SF. I say the last party, but it’s more like the first. My friends know that I absolutely hate planning anything, and I’m notorious for suggesting “don’t you think it would be a great idea to…” and somehow get an unsuspecting soul to plan an event that I really want to participate in. But this time, I decided to get off my lazy butt and do it myself [pat myself on back for being less lazy]!
The main attraction of my party is a photo booth. I actually saw this at another friend’s birthday party (thanks Christy ;]) and thought it was the most wonderful idea! Unfortunately I don’t have any professional photographer friends who have the entire set up, but I do have a decent DSLR. I looked through countless tutorials on DIY photo booths, and finally came up with a solution that’s perfect for me, so I thought I would share my experience like everyone else 🙂

What I wanted >>>
There are a ton of tutorials on this already, and I found it difficult to search for one that fits my criteria, which are:
- Using a DSLR that does not have tethering capability
- Ability to view photos on screen
- Automatic printing
- No expensive equipment purchase

What I needed >>>
The components of a photo booth are relatively simple. The list includes:
- Camera
- Computer
- Monitor
- Printer
- Photo paper
- Backdrop
- Lighting
- Photo booth program
- Props

The Program >>>
The first few items are pretty easy, but I spent a lot of time looking at the last two. For the Photo booth program, I looked at a few popular options:
- Breeze: this one seems to be used by the professionals. The company offers programs for both Canon and Nikon, work on both Mac and PC, and has a ton of functionality. The pricing is pretty expensive, but you can download a fully functional trial version that works for 15 days (the Mac trial version does not expire but will put a watermark on the pictures). Unfortunately, it only works with cameras that have tethering, and I just recently downgraded from a Nikon D200 to Nikon D3200 🙁
- Sparkbooth: This one seemed super easy to install and use, but it only works with web cams and doesn’t support DSLR or any other external cameras 🙁
- The DSLR Booth: This was actually the first one that I found, which I rejected because it doesn’t have a Mac version yet. However, after searching around for alternatives with no avail, this is the one I ended up choosing (I’m running it on my Mac using VMWare Fusion). It’s compatible with any camera that has a PTP mode, which solves my no-tethering problem. It’s very easy to change print formatting and if you have any programs that can edit a PNG file, you’ll be able to put a watermark on your final product. You can choose to automatically print or save files on disk, and there’s even an option to share photos to social media!

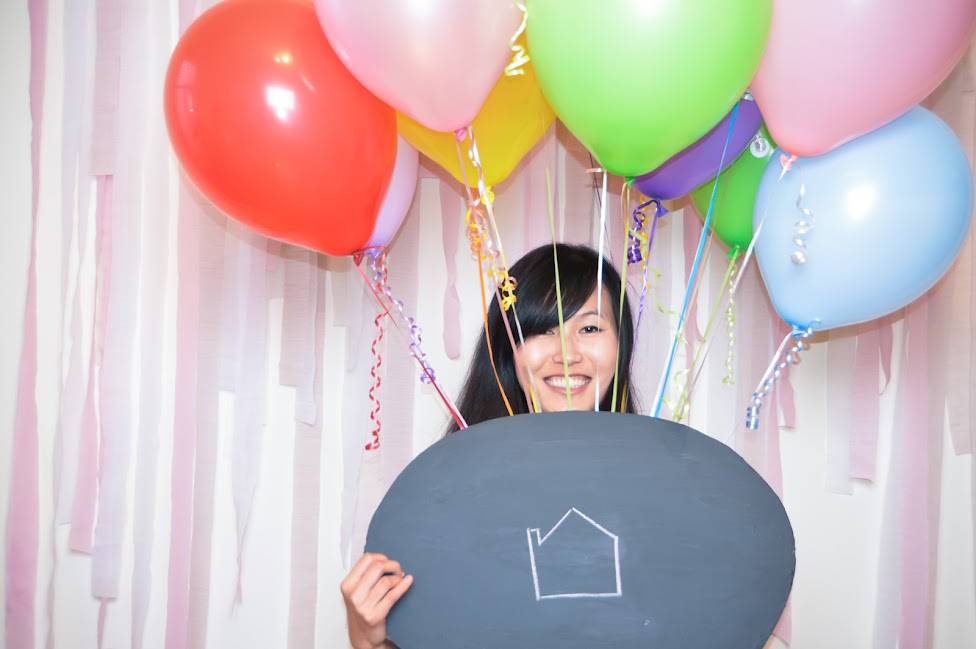
The Props >>>
I also searched around quite a bit for props ideas. Being my lazy self, the first thing I did was look on Amazon, but thought it was pretty ridiculous to pay $25-$50 for a few pieces of cheap foam cut out shapes. Thankfully, the wonderful Internetz community is ever so philanthropic when it comes to providing DIY resources and ideas. I saved a few of my favorites on Pinterest for those who are interested.
A few tips and lessons learned from my photo prop making sessions:
- Unless you have some specialized printer and paper readily available, the easiest way is to print out templates on regular paper, glue it onto something sturdy, and then cut it out.
- If you are lazy/cheap/impatient like me and don’t want to go to a store to buy paper, use nice catalogs or old boxes. I found the San Francisco Ballet catalog to be just the right thickness 🙂
- If the paper’s not thick enough it might curl up after gluing, so just put it into thick books immediately after the gluing so it dries flat.
- If you don’t want to buy wooden dowels (or in my case, run out of wooden dowels because I made way too many props), collect some disposable chopsticks when you order Chinese food to-go.
- Packaging tape works just as well as hot glue.
- Chalkboard paint is awesome. My roommate has been obsessed with painting everything around the house with chalkboard paint, so I borrowed some to make some speech bubbles that people can write silly things on. Thanks Jeannie! 😀
Besides my DIY props, I also wanted some feather boas and other not so flat things. I checked out Amazon and Party City and thought it was ridiculous to pay $5-$8 for a feather boa that I would use only once, so I stopped by the dollar store, and grabbed boas, cowboy hats, swords, and even butterfly wings! Would only suggest this if you are planning to do this once though, since everything pretty much fell apart by the end of the night…

Other Things >>>
- Get a dark backdrop if possible. I was lazy and wanted to just use my regular wall, but since it’s off white, people’s skin color would appear washed out.
- Make sure whatever you use for the backdrop is big enough! If not, a solid wall works better than a back drop that doesn’t cover everything.
- Good lighting is a must if you want decent pics. I originally got a continuous lighting set, and the light is really just not strong enough to take “professional” looking photos 🙁 So I ended up borrowing a friend’s Alien Bees B800 flash unit, which worked wonders (Thanks Ryan!).
- Test out the printing function early! My prints didn’t turn out as well as hoped because I used HP paper with my Canon printer.
- More than anything else, the most important element is awesome friends who are not afraid to be silly with you!

Leave a Reply